


Final Evaluations Manager
Manage, activate, and view results for Final Evaluation sets.
Visit Final Evaluations Manager
SUPPORT CONTACT
Support is provided via the EEE Support Team
Final Evaluations Manager Help Documentation
Getting to know the EEE+ Final Evaluations Manager
Learn more about the tool and final course evaluations by verifying your department’s membership, helping contact, and reviewing the Memorandum of Understanding (MOU).
Preparing Evaluation Forms and Email Templates
Start creating all form templates and reminder email templates before activating evaluations.
Modifying an Academic Senate Template
Creating your Template
Managing Form Templates
Email Announcements and Reminders
Activating Evaluations
Activate evaluations by reviewing available course sections and creating evaluation sets.
View Available Course Sections
Setting up an Evaluation Set
Activating and Managing Evaluations
Working with Evaluation Results
After the end of the term, download individual or all department evaluation results, including data from EEE Legacy Evaluations.
Downloading Results from an Evaluation Set
Using the Reports area
Downloading EEE Legacy Evaluation Results
Getting to know the EEE+ Final Evaluations Manager
Overview
The EEE+ Final Evaluations Manager is a homegrown web application that provides UCI schools and departments the ability to conduct official teaching evaluations on behalf of instructors and teaching assistants.
Results from evaluations conducted via the EEE+ Final Evaluations Manager are available to the individuals evaluated, the affiliated school and/or department administrators, and in EaterEvals (only Senate faculty who have not opted out).
EEE+ Final Evaluations Manager contains all historic evaluations data from the EEE Legacy Department Evaluations tool (2002-2020), which it replaced.
Review the MOU
The Memorandum of Understanding (MOU) outlines the evaluations toolkit, OIT’s responsibilities, Senate policies, and department responsibilities. It can be found on the left side of the tool’s homepage at any time.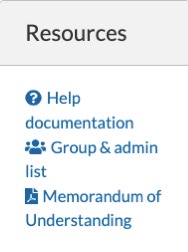
Please review the MOU periodically.
Access
Each group is allowed up to two department administrators, and one authority.
- Department administrators: Can manage evaluations, emails, form templates, activate evaluations, and download reports and results.
- Authority: Approves changes to department administrators
Making changes to access:
If you need to make changes to the department administrators, authority, group name, or departments within the group, please send an email to eee-support@uci.edu outlining these changes.
Note that any changes will require the approval of the current authority; if the authority itself needs to be changed, approval will be needed by the Dean or an Associate Dean (with undergraduate education or academic personnel in their areas of responsibility).
Using the Homepage
The EEE+ Final Evaluations Manager Homepage contains useful information, such as the list of departments and co-administrators associated with the evaluation group, as well as the Help Contact and two resources to use as you activate evaluations or download results.
Primary Help Contact
The Help Contact is found on all evaluations and used by instructors and students who have non-technical questions about department-activated evaluations.
To set up your help contact:
- Login to EEE+ Final Evaluations Manager.
- Click the Home tab (on the top blue navigation bar).

- Locate the Primary Help Contact text. (it should be just below your group name)
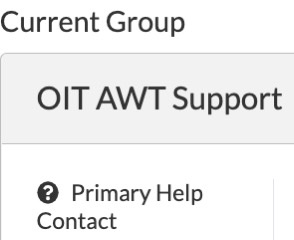
- Click the Enter one now link.
If you already have a Primary Help Contact set, you can update it at any time by following the steps above but clicking the Change link in step 4 instead of Enter one now.![]()
Change Evaluation Groups
If you are a part of more than one department, you may have access to multiple evaluation groups. To access a different group, click the Change Groups link found in the top right corner of the page.

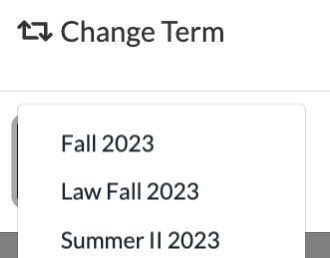
Change Term
To navigate to past terms, click the Change Term link found in the top right corner of the page.

Helpful resources
As an administrator, there are two resources you can refer to while activating final evaluations or gathering results.
List of administrators from other departments:
You may occasionally need to contact administrators from other departments. For example, it’s recommended to coordinate the activation of evaluations for cross-listed classes with the other school or department.
To find other administrators’ associated groups and contact information, locate the Resources section on the left side of the page, and click the Group & admin list link.
MOU
The Memorandum of Understanding (MOU) outlines the evaluations toolkit, OIT’s responsibilities, Senate policies, and department responsibilities. To review the MOU, locate the Resources section and click the Memorandum of Understanding link.
Preparing Evaluation Forms and Email Templates
Modifying an Academic Senate Template
Creating your Template
Managing Form Templates
Email Announcements and Reminders
Modifying an Academic Senate Template
Evaluation Form Templates contain all the questions and response options that will be used when activating evaluations. You can simply distribute one of the forms created by the Academic Senate:
- Student Course Feedback Form
- Campuswide Teaching Evaluation Form (Letter Scale)
- Campuswide Teaching Evaluation Form (Numeric Scale)
If you’d like to do this, skip to Setting up an Evaluation Set.
Otherwise, if you’d prefer to make modifications to one of the available Senate templates, this help document will cover this process.
To base your custom form on one of the Academic Senate Form Templates
- Login to EEE+ Final Evaluations Manager.
- Click the Forms tab (on the blue navigation bar at the top of the page).

- Under the Senate Templates section, locate the template you want to customize.
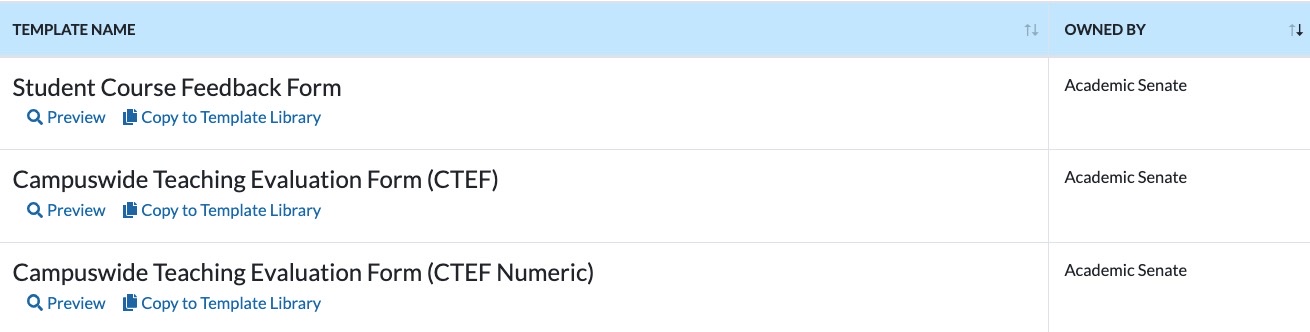
- Click the Copy to Template Library link under the name of the template.

- Locate the gold highlighted copy in the Template Library section, below the Senate Templates.

- Click Edit to enter the form editor.
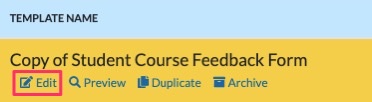
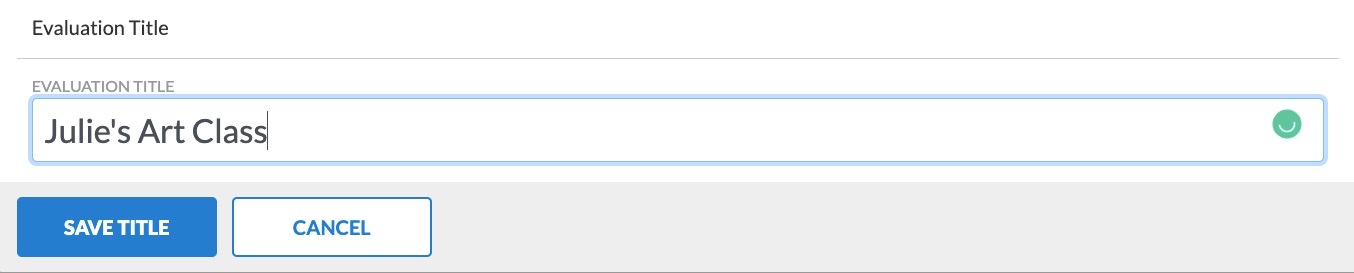
- Change the title of the form by clicking the title, which will be similar to “Copy of Student Feedback Form” or “Copy of Campuswide Teaching Evaluation Form (CTEF)”.
Learn more about using the form editor.
Creating your Template
Evaluation Form Templates contain all the questions and response options that will be used when activating evaluations.
Creating your template is optional. If you’d prefer to create an entirely new template from scratch instead of using a Senate form or a modified version of one, follow the instructions below.
- Login to EEE+ Final Evaluations Manager.
- Click the Forms tab (on the blue navigation bar at the top of the page).
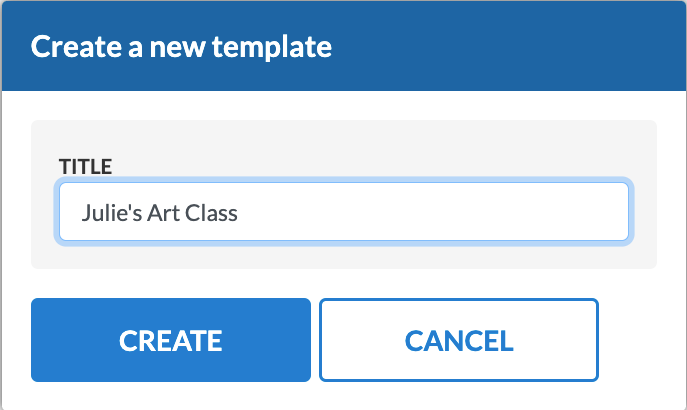
- Click the +Create a new template button on the right side of the page.

- Give the form a name.
- Add questions or elements.
- Once you’re finished click the Done button near the left corner of the editor.

Be sure to preview your form by clicking the Preview link under the form name, to make sure that the questions, answers, and any other elements are correct.
Creating a question and adding elements in the form editor
- Login to EEE+ Final Evaluations Manager.
- Click the Forms tab (on the blue navigation bar at the top of the page).
- Create a new template or edit an existing one.
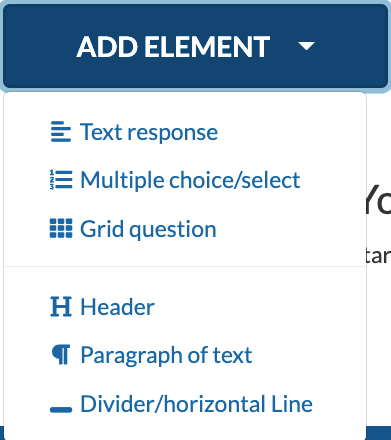
- Click the blue Add Element button at either the top or bottom of the form.

- Select a question type or element. (See “Types of Questions” below, to learn more)
- Enter the question text and response options where applicable.
- Click Save. You should see a green notification that the item was successfully created.

Note: you can add formatting to questions and additional objects using markdown. For more information about the syntax available in Markdown, including bold, italic, and links, please click Learn more about Markdown near the lower right corner of the text entry box.
Types of Questions
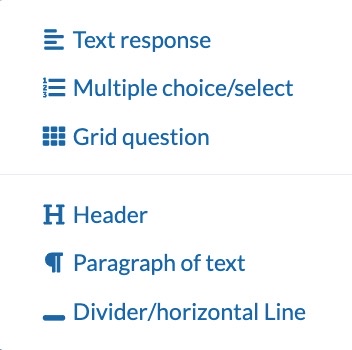
These are the objects that can be added to an Evaluation template.
- Text response question
- Multiple choice/select question
- Grid question
- Headers
- Paragraphs of text
- Dividers/horizontal lines
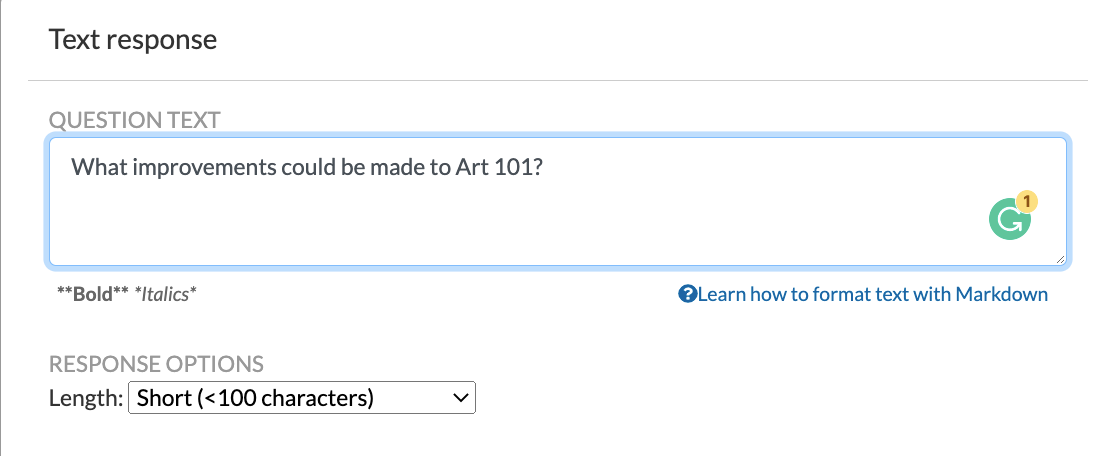
Text Response
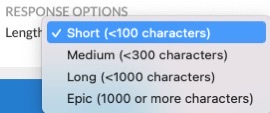
There are four types of text response questions:
- Short: participants can enter a maximum of 100 characters
- Medium: participants can enter a maximum of 300 characters
- Long: participants can enter a maximum of 1,000 characters
- Epic: participants can enter more than 1,000 characters
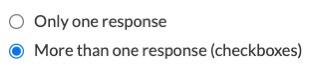
Multiple Choice/Select
There are two types of multiple-option questions:
- Multiple Choice: participants can select only one of the available options
- Multiple Select: participants can select one or more of the available options
Grid Question
This question type allows you to create multiple questions with a shared set of answer choices for each question.
Contextual Information
You can use a contextualization element to provide the information within the evaluation. This information could include specific instructions, additional information, or other material that the participants would need to complete the question or set of questions.
Back to Top
Managing Form Templates
Use the Forms area in Final Evaluations Manager to manage your existing evaluation templates, such as using the form editor to make changes to questions, duplicate, or copy out templates to other groups you have access to.
What this document covers:
- Editing a form template
- Managing questions within a template
- Archive/unarchive templates
- Copying a form template to another group
Editing a form template
Additional changes to questions and elements can be made within the form template, however, these changes will not be reflected if the evaluations are currently open for participation.
- Login to EEE+ Final Evaluations Manager.
- Click the Forms tab (on the blue navigation bar at the top of the page).
- Under Template Library, click the Edit link below the name of the form template.
- Make changes as needed.
- Click Done when you are ready to leave the template editor.
Note: The template will be automatically saved as questions are added or changed.
Managing questions within a template
Reordering questions
You can reorder a question by clicking the directional icon, and then dragging the question to a new location within the evaluation template.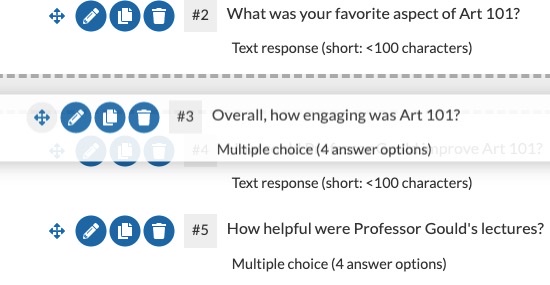
Alternatively, if you are in the process of editing a question, you can change the ordering using the arrows in the lower right corner of the editor.![]()
Editing a question
You can click the pencil icon to the left of the item to begin the process of editing a question or element within the evaluation template.
Removing a question
You can click the trash icon to remove a question from the evaluation template.
Duplicating a question
You can duplicate a question by clicking the copy icon next to it.
- Login to EEE+ Final Evaluations Manager.
- Click the Forms tab (on the blue navigation bar at the top of the page).
- Under the name of the form template, click Duplicate.
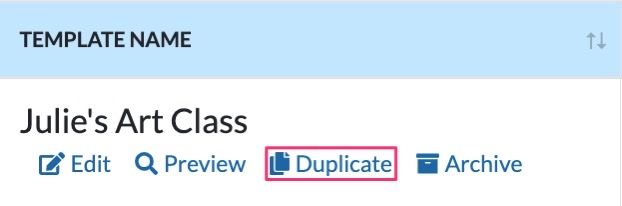
The page will refresh, and your Template Library will contain the new copy.
Archiving/unarchiving a Form Template
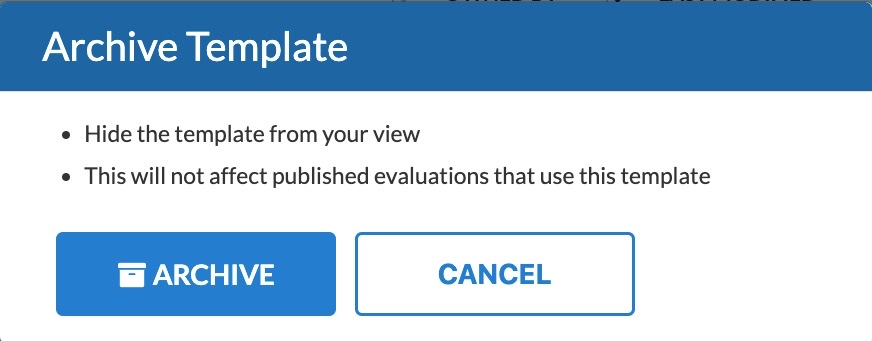
To hide form templates from your view, you can archive them and place them under the Archived Templates section. Archiving a template will not affect activated evaluations.
To archive a form template:
- Login to EEE+ Final Evaluations Manager.
- Click the Forms tab (on the blue navigation bar at the top of the page).
- Under the name of the form template, click Archive.
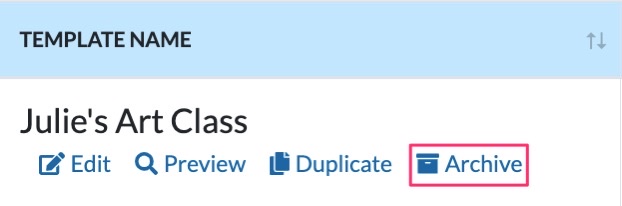
- Click the blue Archive button.
To unarchive a form template:
- Click the Archived Templates link to expand the section.

- Under the name of the form template, click Unarchive.
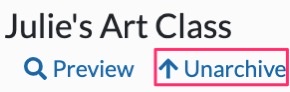
The page will refresh, and your template will move into the Template Library.
Copy a form template to another group
If you are a part of multiple evaluation groups, you can copy form templates to those groups and use them when activating evaluations for the associated courses.
To copy a form template to another group:
- Login to EEE+ Final Evaluations Manager.
- Click the Forms tab (on the blue navigation bar at the top of the page).
- Under the name of the form template, click Copy to another group.
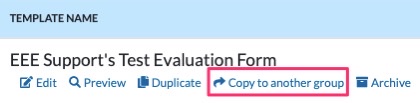
- In the drop-down, select the target group.
- Click the blue Copy button to finish copying the form template.
The copied template will be placed under the target group’s Template Library section.
Email Announcements and Reminders
Email templates for announcements and reminders are used when the system sends out emails you have scheduled. Working with email templates should occur in two main steps: first, set up your email templates; second, schedule email reminders using the templates you’ve created. This help document covers the former. If you’ve already set up templates, see this help document to learn how to schedule them as reminders.
Note: you’ll only need to set up an email template once per evaluation group; your templates will be available in any quarter within the tool.
What this document covers
- Creating a template
- Editing a template
- Copying an email template to another group
- See the scheduling history of a template
Creating a new email template
Creating email templates allows you to add custom text about the evaluation. Our system will automatically include the instructor’s name, course information, and a closing date for the evaluation, as part of the contents of the email.
- Login to EEE+ Final Evaluations Manager.
- Click the Email tab (on the blue navigation bar at the top of the page).

- Click the +Create new template button located towards the right side of the page.

- Configure the email template:
-
- Nickname: A short name displayed only to department evaluations admins, and NOT to instructors or participants
- Template Type: Used to help you find your email templates when scheduling emails later
- Subject: The subject line of the email; be sure to keep it concise and catchy
- Opening/intro text
- Closing text
Be sure to preview your email by clicking the Preview link under the email template name, to make sure that the contents are correct.
Once you’ve finalized the templates, you can now schedule email announcements and reminders within an evaluation set.
Editing an email template
Additional changes can be made to email templates; these changes will apply to future emails even if they’ve already been scheduled in an evaluation set.
- Login to EEE+ Final Evaluations Manager.
- Click the Email tab (on the blue navigation bar at the top of the page).
- Under the name of the email template, click the Edit link.
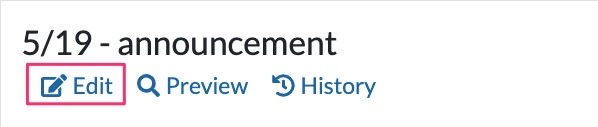
- Make changes as needed.
- Click Preview and then Done when you are ready to leave the template editor.
Copy an email template to another group
Once created, templates are bound to the group context in which you created them. If you are a part of multiple evaluation groups, you can create a copy of an email template for any of those groups for use in them.
To send a copy of an email template to another group:
- Login to EEE+ Final Evaluations Manager.
- Click the Email tab (on the top blue navigation bar).
- Under the name of the email template, click the Copy link.

- In the drop-down, select the target group.
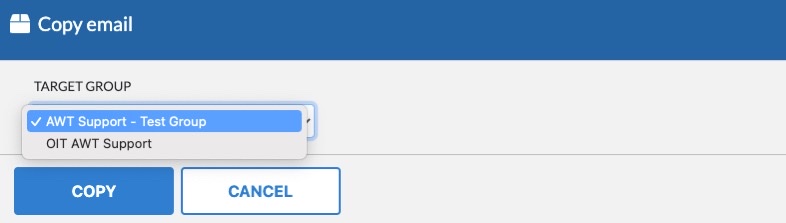
- Click the blue Copy button to finish copying the email template.
See the Scheduling History of an Email Template
Each email template has a scheduling history that provides details about the evaluation set in the email, as well as the status of the email (i.e., Scheduled or Sent).
To view the scheduling history:
- Login to EEE+ Final Evaluations Manager.
- Click the Email tab (on the top blue navigation bar).
- Under the name of the email template, click the History link.

Activating Evaluations
View Available Course Sections
Setting up an Evaluation Set
Activating and Managing Evaluations
View Available Course Sections
One of the features of Final Evaluations Manager is a list of the sections and instructors available for evaluation activation in your group. Before activating your evaluations, please visit the Course Sections area to ensure that all of your classes and instructors appear. The Schedule of Classes powers this list; if your data is complete there, then it should also be complete here.
Note: This list shows all the possible evaluations that could be activated; you still must activate evaluations using Evaluation Sets.
Locating course sections
There are two different ways to find a course or instructor in the Course Sections area: using the search bar or filters.
Start by navigating to the Course Sections area:
- Login to EEE+ Final Evaluations Manager.
- Click the Sections tab (on the blue navigation bar at the top of the page).

- Find a course or instructor using one of the two search options below.
1) Find courses via the search bar:
Search the list of courses by entering the instructor’s name, course name/code, or department using the search bar on the Sections page.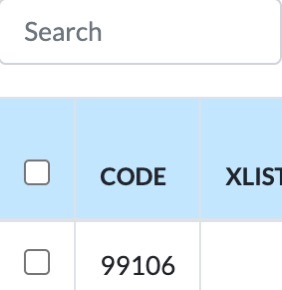
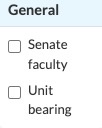
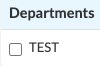
2) Find courses via filters:
One other way to find a course is to use the filters on the left side of the Sections page. There are three different categories to help narrow down your search:
- Course Type: filter by the type of instruction (e.g., lecture, discussion, seminar, etc.)

- General: choose between Senate faculty or unit-bearing courses
- Departments: view by department(s)
To revert to the zero state, click the Clear all filters button located at the bottom of the filter selection.
Manually add individuals not listed in the SOC
To associate additional people to a course code (e.g., there’s a section with more than 3 instructors or sections where TAs aren’t entered in SOC and need to be evaluated), follow the steps below:
- Login to EEE+ Final Evaluations Manager.
- Click the Sections tab (on the blue navigation bar at the top of the page).
- Click the Add person + class association button located towards the right side of the page.

- Enter the UCInetID of the person you wish to add.
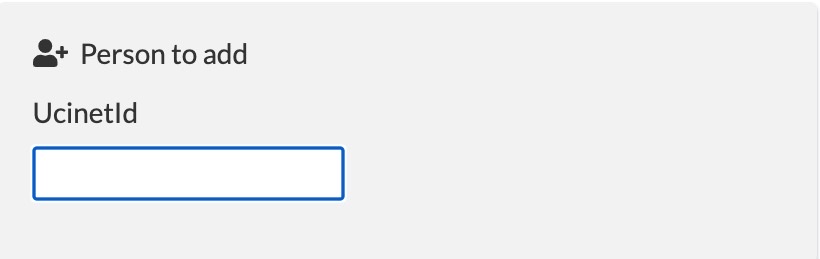
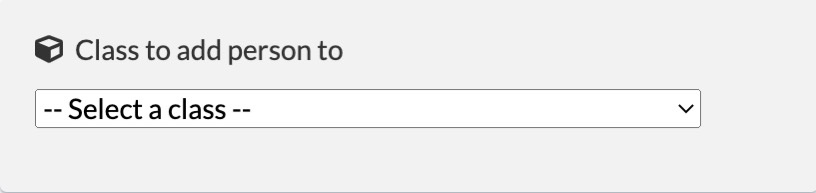
- Select the class from the drop-down.
- Click the blue Look up person and confirm button.

- Verify that the person and class are correct, and then click Add person + class association.
- If the person and/or class is not correct, then click the Change person or class button to go back and change it.

The new association will then appear in the Sections list with an icon indicating that the user was added as an assistant by a department admin.
![]()
Note that this addition will only affect the EEE+ Final Evaluations Manager; adding a person here does not grant them access to any other resources for the class.
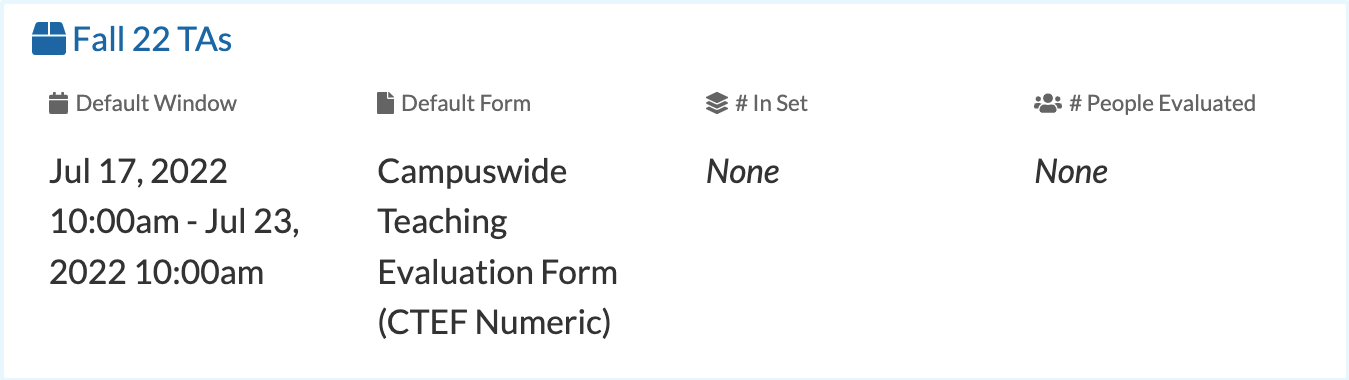
Setting up an Evaluation Set
Evaluation sets are how you activate and manage evaluations for a quarter. You’ll create at least one new evaluation set each term.
Each evaluation set includes:
- A set of instructors/classes to be evaluated
- A common evaluation form
- Common settings, such as the evaluation submission window for students
- A schedule for the initial email announcement and additional reminders
What this document covers:
- How to use an evaluation set
- Creating a new evaluation set
- Setting a default availability window
- Setting a default evaluation form
- Scheduling email announcements and reminders
- Enabling instructor permissions (optional)
How does the EEE+ Support Team recommend that evaluation sets be used?
This depends on how your unit conducts online evaluations. There are a couple of ways that evaluation sets can be used:
By instructor type: if you have different forms for faculty and TAs, you can have evaluation sets like this:
- Faculty
- TAs
By department: If you run evaluations at the school level, but have different forms or reporting needs for departments, you can have evaluation sets like this:
- Department 1
- Department 2
- Department 3
- and so on
You could also use evaluation sets to bundle evaluations for specific programs.
Create a new evaluation set
After you’ve created your evaluation forms and email templates, you’re ready to create an evaluation set that will be used to activate evaluations.
To create an evaluation set:
- Login to EEE+ Final Evaluations Manager.
- Click the Evaluation Sets tab (on the blue navigation bar at the top of the page).

- Click the Create Evaluation Set button located on the right side of the page.

- See above for information on ways to use evaluation sets.
- Provide a name for the set.
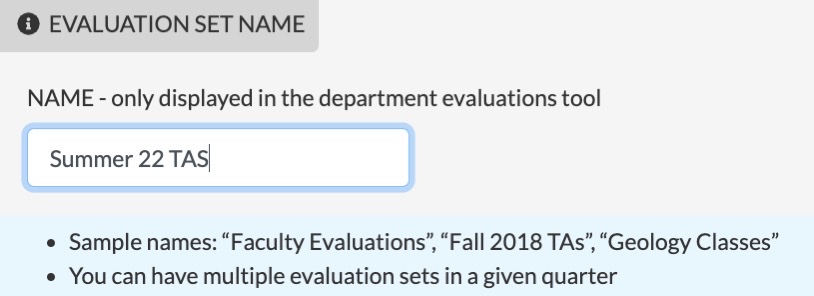
- The name is only displayed within the tool. Students and instructors will never see it.
- Choose the default availability window.
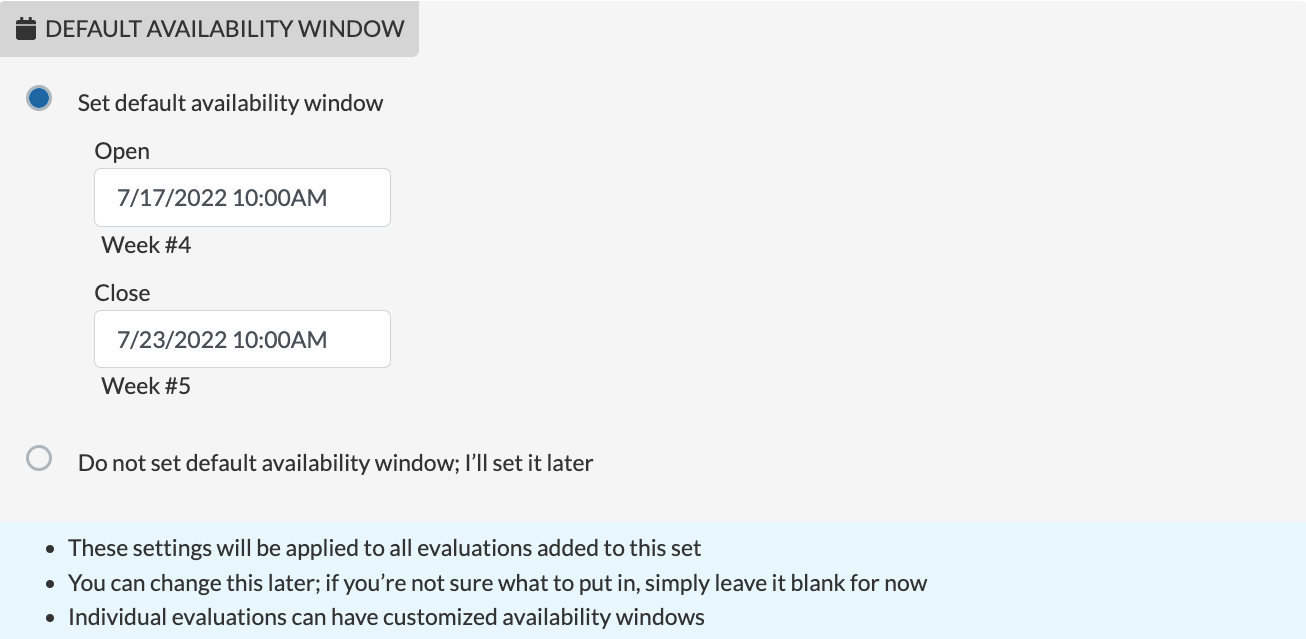
- This window can be set or changed later
- Individual evaluations can have custom windows that differ from this default window
- Choose the default form.
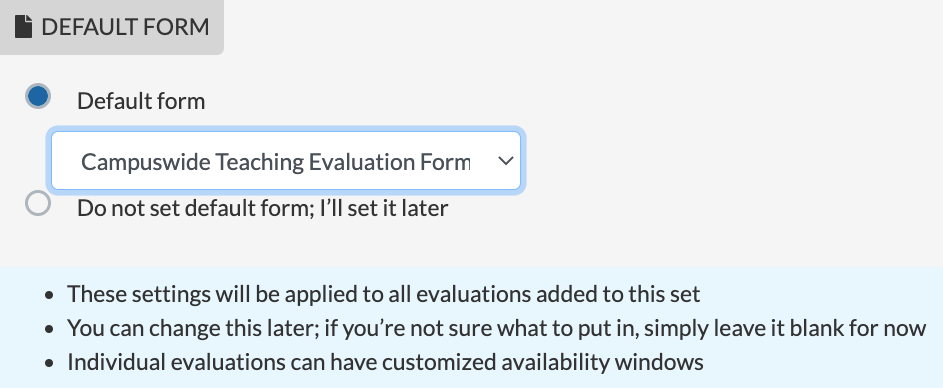
- This form can be set or changed later
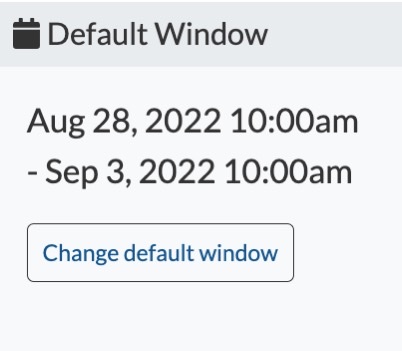
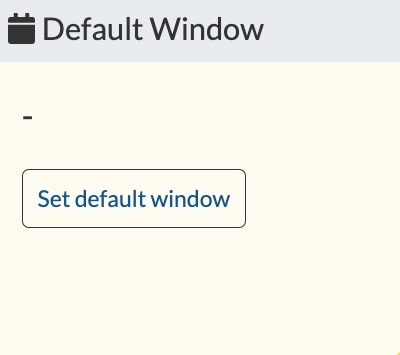
Setting a default availability window
You can set an availability window or make adjustments to it within the evaluation set; these settings will be applied to all evaluations added to this set.
- Login to EEE+ Final Evaluations Manager.
- Click the Evaluation Sets tab (on the blue navigation bar at the top of the page).
- Select the name of the evaluation set.
- Under the Default Window section, click the Change default window button.
- If you are setting a window for the first time, select the option for the Set default availability window.
- Otherwise, specify an Open and Close date and time.
Note: the close date must be before the term’s final grade deadline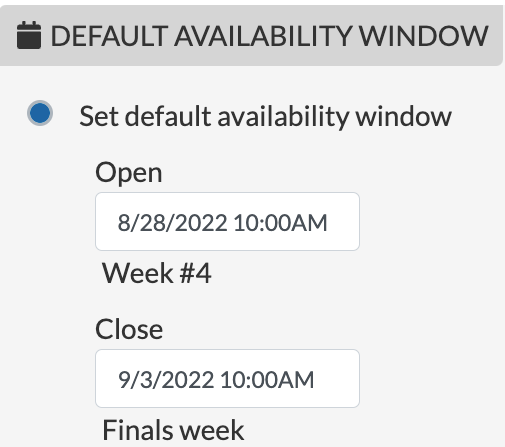
- Once you’re finished, click the blue Update button.

If you need to give a custom availability window to only certain evaluations within the set, see the Change an individual evaluation’s window section in the Activating and Managing Evaluations help document.
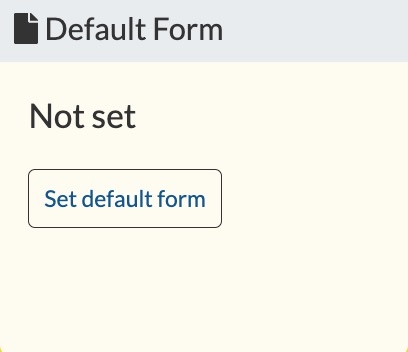
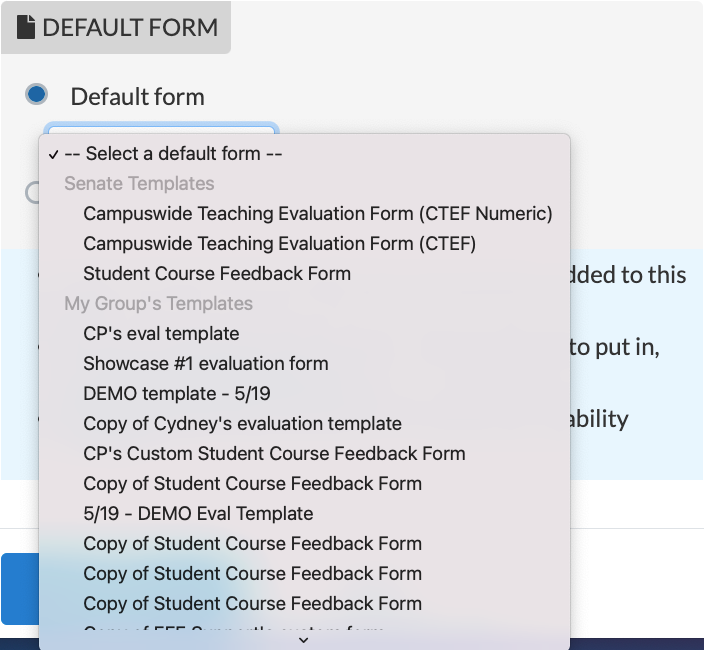
Setting a default evaluation form
In the evaluation set, you can set a default evaluation form if you haven’t already, or specify a different one. Similar to the availability window, this form will be applied to all evaluations associated with the set.
- Login to EEE+ Final Evaluations Manager.
- Click the Evaluation Sets tab (on the blue navigation bar at the top of the page).
- Select the name of the evaluation set.
- Under the Default Form section, click the Set default form button.
- If you are setting an evaluation form for the first time, select the option for the Default form.
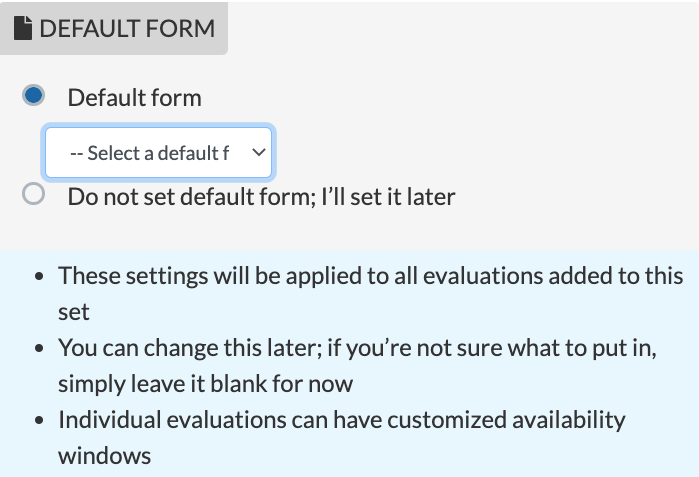
- Otherwise, in the drop-down, choose between one of the Senate forms or one of your group’s custom form templates.
- Click the blue Update button to save the form.
Once you’ve chosen the default evaluation form, you can start activating evaluations by adding them to the set and then scheduling emails or vice-versa.
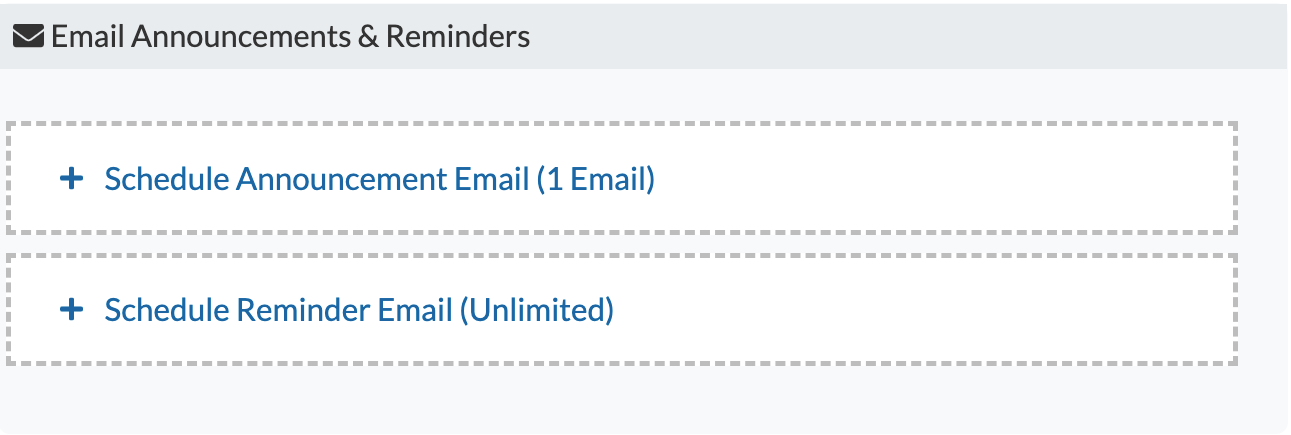
Schedule email announcements and additional reminders
After you’ve created your email templates, you can now schedule emails in an evaluation set.
Announcement emails are sent to the person being evaluated and participants as soon as the evaluation is available, whereas email reminders are sent to non-participants at the scheduled time.
To schedule an announcement notification or email reminder:
- Login to EEE+ Final Evaluations Manager.
- Click the Evaluation Sets tab (on the blue navigation bar at the top of the page).
- Select the name of the evaluation set.
- Under the Email Announcements & Reminders section, click either the Choose Announcement notification email or Choose Reminder Emails button.
- For announcement emails: choose the email template
- For reminder emails: choose the email template, select a time to send the message out, and decide whether the person being evaluated should receive a copy
- Once you’ve made your changes, click the blue Save Settings button.

- To schedule additional email reminders, repeat step 4.
Provided emails have not been sent, you can always change the email template or reschedule a reminder by clicking the Edit link, or cancel the scheduled emails by clicking Cancel.
Enabling instructor permissions (optional)
By default, evaluation administrators are responsible for changing the availability window of evaluations. If it is your unit’s practice to allow instructors to change their evaluation windows, you can enable the setting to do so.
To enable the permission:
- Login to EEE+ Final Evaluations Manager.
- Click the Evaluation Sets tab (on the blue navigation bar at the top of the page).
- Select the name of the evaluation set.
- Under the Instructor Permissions section, click the Change Permissions button.
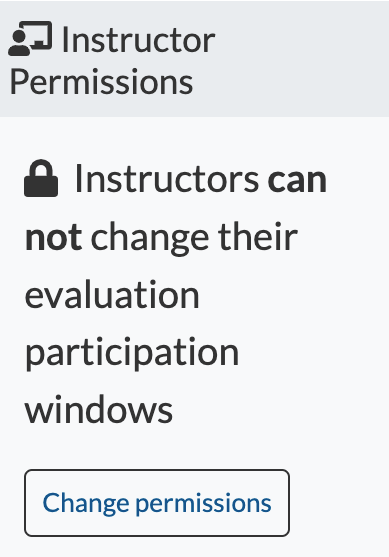
- Please select the option to Allow instructors to change the participation window for their evaluations.

- Click the blue Save Changes button to save the form.
 Back to Top
Activating and Managing Evaluations
Final Evaluations Manager supports two ways of activating evaluations: select from a list of instructor/class combinations or upload a CSV file. This document covers both processes, including how to modify settings for individual evaluations.
What this document covers:
- Activate individual evaluations via the Course Sections list
- Bulk activate evaluations via CSV file
- Activating for cross-listed sections
- Change an individual evaluation’s window
- Remove or delete an evaluation from a set
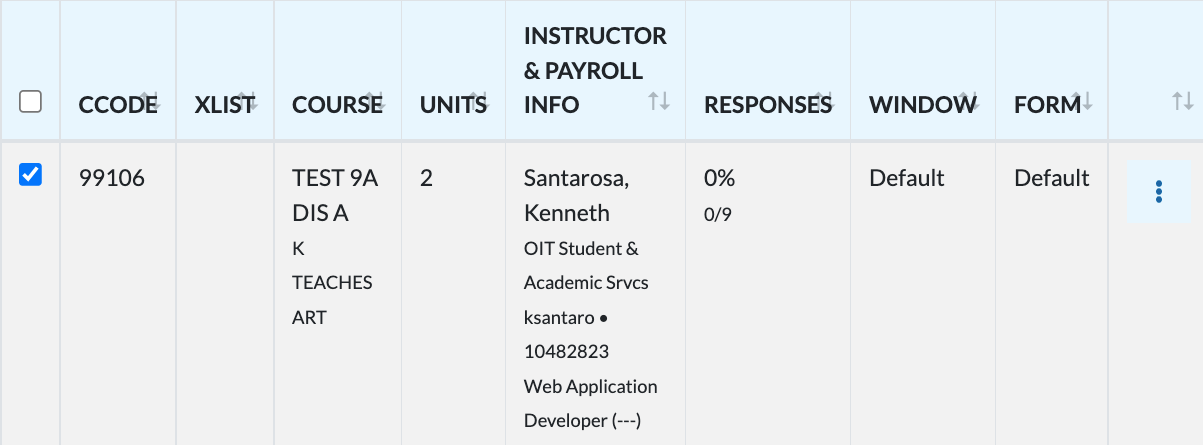
Activate individual evaluations via the Course Sections list
Use the Course Sections area to choose a list of classes to activate evaluations. To help narrow down your search, use any of the three-course type filters or the search bar to find a specific course or person.
To activate individual evaluations:
- Login to EEE+ Final Evaluations Manager.
- Click the Evaluation Sets tab (on the blue navigation bar at the top of the page).
- Select the name of the evaluation set.
- At the bottom of the page, click the blue Add Evaluations button.

- Check the box next to each course you’d like to activate.
- Once you’re finished, click the blue Add Selected button located at the top right corner of the page.

- If you need to add more, click the Add Evaluations button again; otherwise, you’re done.
Note: It is strongly advised to check on your evaluations after creating them to make sure that there are no errors or glitches. If you encounter errors, contact EEE+ support.
If you do not see the instructor or course on this list, you may need to go to the Course Sections area and manually associate the person with the course.
Bulk activate evaluations via CSV file
If you are in a larger department and have several evaluations to activate, then this option is for you. Before activating, please ensure the CSV file has one row per evaluation in the following format:
code, ucinetid
or
code, employeeIdNumber
This is in the same format as the EEE Legacy Evaluation system.
To bulk activate evaluations:
- Login to EEE+ Final Evaluations Manager.
- Click the Evaluation Sets tab (on the blue navigation bar at the top of the page).
- Select the name of the evaluation set.
- Click the Bulk Activate Evaluations button at the bottom of the page.
Note: you can also click the Bulk Activate Evaluations button near the top right corner of the Evaluation Sets page; either process will bring you to the same page.
- Select the evaluation set from the drop-down if not already chosen.

- Upload the CSV file.
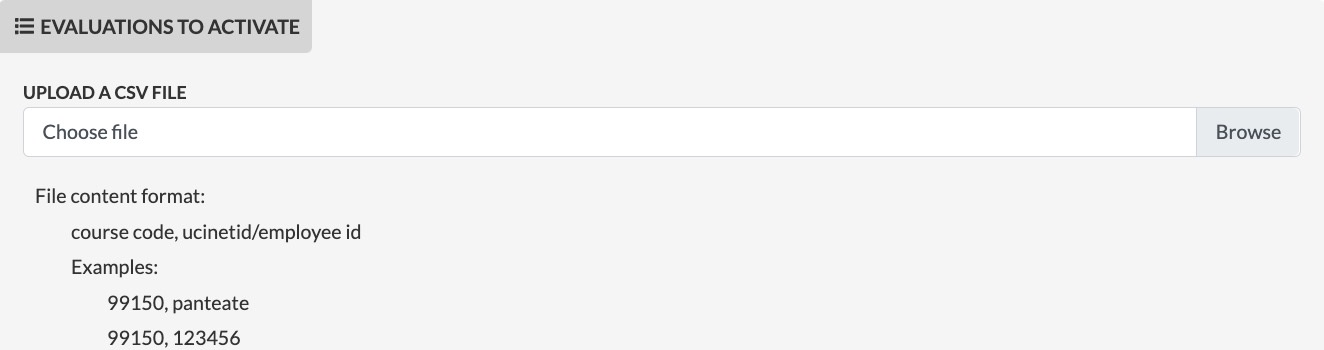
- Click the blue Upload file & run through checks button to activate evaluations.

Note: It is strongly advised to check on your evaluations after creating them to make sure that there are no errors or glitches. If you encounter errors, contact EEE+ support.
Final Evaluations Manager features a guided process for uploading and processing this file. It includes checks for invalid classes or people, cross-listing, and more.
Activating for cross-listed sections
In the evaluation system, cross-listed sections will be automatically merged and activated as a single evaluation.
When activating cross-listed sections via CSV file, the system will check if any evaluations are part of another group’s evaluation set. If flagged, you can either discard the section from your group’s evaluation set or include the evaluation in the set (students will be prompted to complete two evaluations).
Change an individual evaluation’s window
After evaluations have been added to the set, you can set a new availability window for an individual evaluation that’s different from the default window.
Creating a new window for an individual evaluation:
- Login to EEE+ Final Evaluations Manager.
- Click the Evaluation Sets tab (on the blue navigation bar at the top of the page).
- Select the name of the evaluation set.
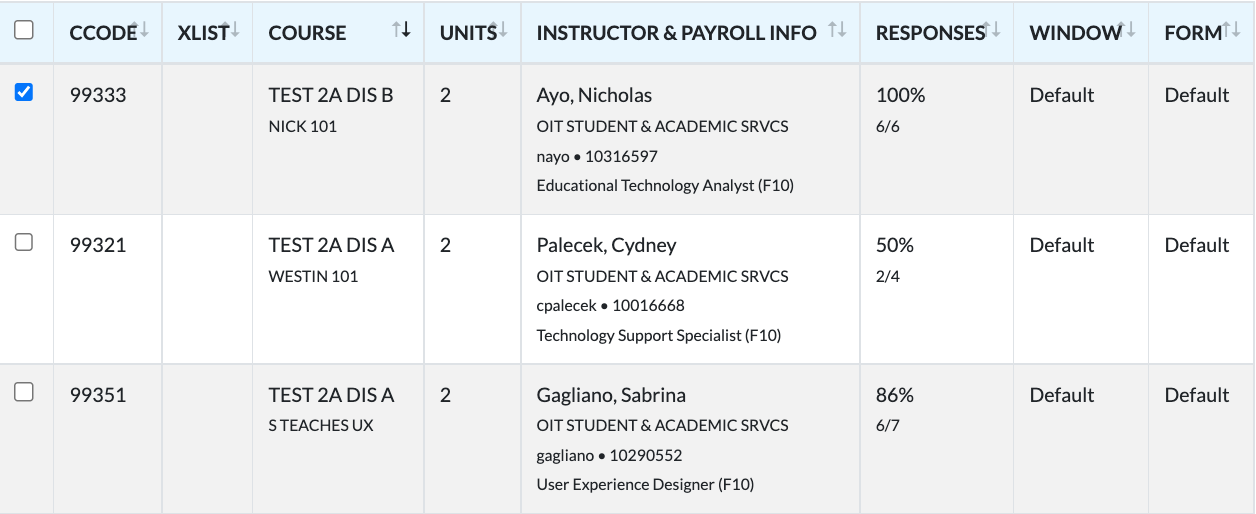
- Under the Evaluations in this set section, check the box next to each course you’d like to change.
- Click the Change window button either at the top or bottom of the section.
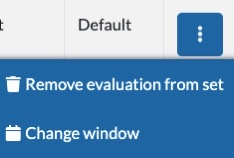
Note: If you are changing a single evaluation window, you can also click the three ‘vertical dots’ menu located towards the right side of the evaluation name and select Change window.
- Specify an Open and Close date and time.
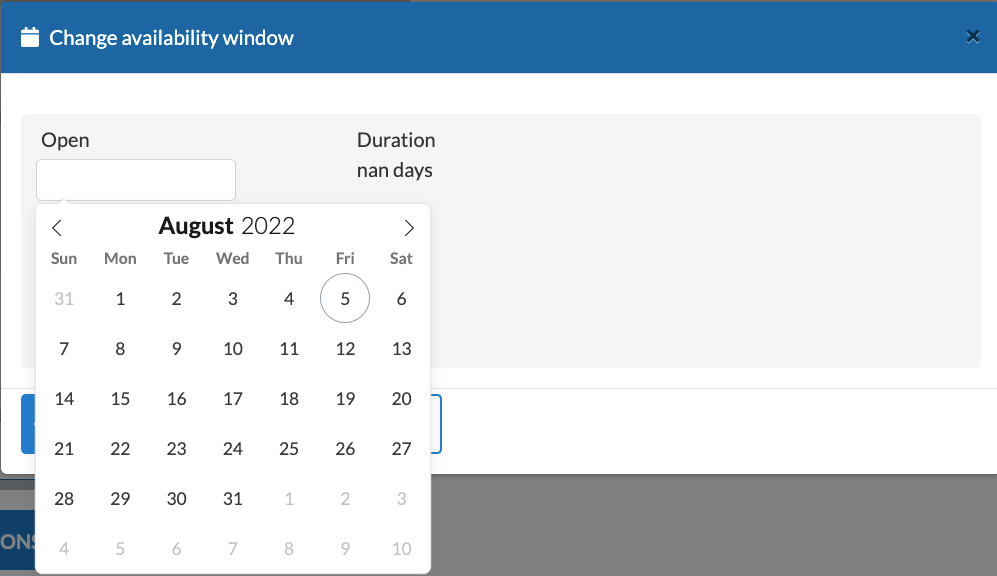
- To finalize the changes, click the blue Save Changes button.

Remove or delete an evaluation from a set
If you’ve incorrectly added an evaluation to a set, there are two ways you can make changes to it:
- Remove an evaluation: if the evaluation window is not open, you can remove and reactivate a new one
- Delete an evaluation: if the evaluation is currently open, you’ll need to delete the evaluation including student submissions, and reactivate a new one
To remove or delete an evaluation from an evaluation set:
- Login to EEE+ Final Evaluations Manager.
- Click the Evaluation Sets tab (on the blue navigation bar at the top of the page).
- Select the name of the evaluation set.
- Under the Evaluations in this set section, check the box next to the evaluation you’d like to change.
- Click the three ‘vertical dots’ menu for that evaluation located on the right side of the page.
- Choose the relevant option (i.e., Remove or Delete).
- If removing an evaluation: confirm the details displayed on the screen and click Yes, remove evaluation.
- If deleting an evaluation: confirm the correct evaluation is chosen and follow the instructions displayed on the screen, followed by clicking on the Yes, remove evaluation button.
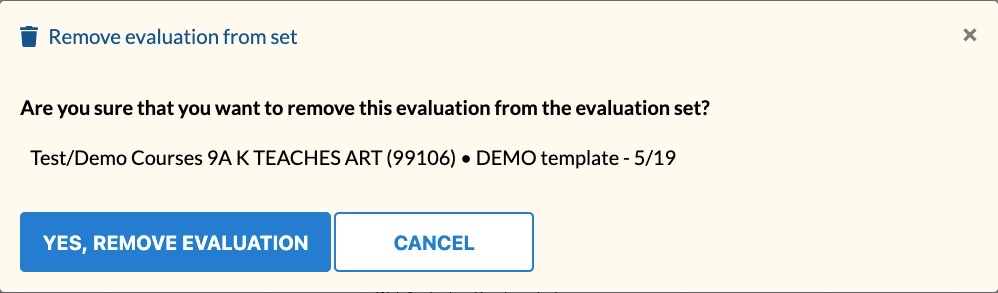
- If removing an evaluation: confirm the details displayed on the screen and click Yes, remove evaluation.
Note that OIT cannot recover evaluations that have been deleted.
Working with Evaluation Results
Downloading Results from an Evaluation Set
Using the Reports area
Downloading EEE Legacy Evaluation Results
Downloading Results from an Evaluation Set
Within an evaluation set, you can directly download all or individual results as a CSV or PDF file.
To download all results from an evaluation set:
- Login to EEE+ Final Evaluations Manager.
- Click the Evaluation Sets tab (on the blue navigation bar at the top of the page).
- Select the name of the evaluation set.
- Under the Results section, click either the Download all results as CSV file or Download PDF button.
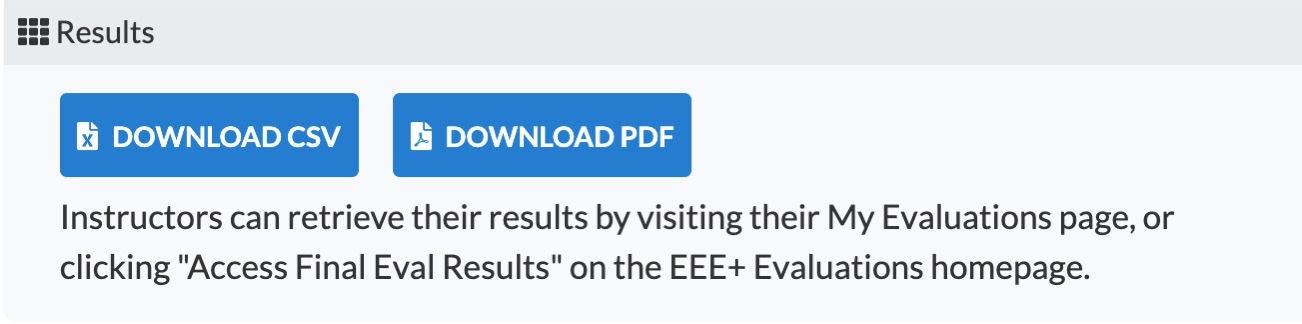
- If downloading as a CSV file, there are three different download options for responses with answer values:
- Both answer value and text: 5 (Strongly Agree)
- Answer values only (if available): Strongly Agree
- Answer text only: 5
To download individual results within an evaluation set:
- Login to EEE+ Final Evaluations Manager.
- Click the Evaluation Sets tab (on the blue navigation bar at the top of the page).
- Select the name of the evaluation set.
- Under the Evaluations in this set section, click the box next to each evaluation you wish to download.
- Click either the Download selected results as CSV or Download selected results as PDF button located at the top or bottom of that section.

Back to Top
Using the Reports Area
Use the Reports area to download evaluation results after the term’s grades submission date. This document will cover the three different reports you can use to download evaluations (based on a certain instructor, course, or term). Otherwise, download results for a specific evaluation set.
Note: If you are in a larger department, please allow a few moments for files to download. Do not navigate away from the page after clicking one of the “Download” buttons referred to below.
Instructor Report
- Login to EEE+ Final Evaluations Manager.
- Click the Reports tab (on the blue navigation bar at the top of the page).

- Select the Instructor report.

- Enter the instructor’s UCInetID.

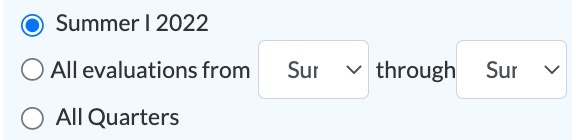
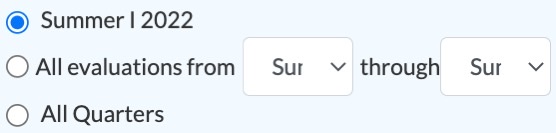
- Select one of the three-term options: the current term, a range of terms, or all quarters.
- Click the blue Look up evaluations button.

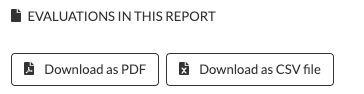
- Download all results by clicking either the Download as PDF or Download as CSV file buttons found at the top of the Evaluations In This Report section.
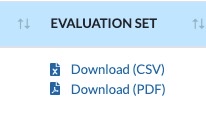
- Otherwise, to download individual evaluations, click the Download (CSV) or Download (PDF) links under the Evaluation Set column.
Course Report
- Login to EEE+ Final Evaluations Manager.
- Click the Reports tab (on the blue navigation bar at the top of the page).
- Select the Course report.

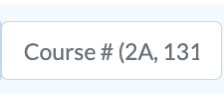
- In the drop-down menu, choose the department name.

- Enter the Course #.
- Select one of the three-term options: the current term, a range of terms, or all quarters.
- Download all results by clicking either the Download as PDF or Download as CSV file button found at the top of the Evaluations In This Report section.
- Otherwise, click the Download (CSV) or Download (PDF) links under the Evaluation Set column to download individual evaluations.
Term Data Download Report
- Login to EEE+ Final Evaluations Manager.
- Click the Reports tab (on the blue navigation bar at the top of the page).
- Select the Term Data Download report.

- In the drop-down menu, select a term.

- Click either the Download term data as CSV or Download term data as PDF button.

Back to Top
Downloading EEE Legacy Evaluation Results
- Login to EEE+ Final Evaluations Manager.
- Click the Reports tab (on the blue navigation bar at the top of the page).
- Click the Access results for evaluations conducted in EEE Legacy Department Evaluations link.

- Click the Change Term button and select a specific term from the drop-down menu.
- Locate the name of the folder under the department name.
Note: if you have access to one or more departments, scroll down to the appropriate section. - Click the View Folder link.
- Check the box next to each evaluation you need to download.
- Download the results by choosing one of the three download options below.
- Download PDF (Zip Archive): downloads a ZIP archive containing individual PDF files, one per selected evaluation
- Download PDF (Merged Single PDF): downloads a single PDF file that combines all selected results
- Download CSV: downloads selected results as a comma-separated-value (CSV) file compatible with most spreadsheet applications. You have the following choices for the output of questions with answer values associated with the responses:
- Both text and numeric answer values (e.g., “5 (Strongly Agree)”)
- only text responses (e.g., “Strongly Agree”)
- only numeric answer values (e.g., “5”)
At any time, you can select a different folder by clicking the Go back button located near the top left of the page.
We want to hear from you!
We want to hear if you have feedback or suggestions for our EEE+ Final Evaluations documentation or spot errors. Don’t hesitate to get in touch with us at eee-support@uci.edu