

Website
Support Contact
Support is provided via the EEE Support Team
For questions about scanning, contact Document Management at (949) 824-4147
Grading Scanned Exams in Gradescope
Background
Assumptions
How to Integrate Gradescope with Canvas
Creating a Gradescope Assignment in Canvas
Linking to a Canvas Course
Choose Scoring Method (In Course Settings)
Syncing Your Roster
Creating Exams in Gradescope
Create Outline
Managing Scans
Manual Association
Grading Submissions
Publishing Grades
Posting Grades to Canvas
Publishing Grades in Gradescope
Background
The process of scanning, grading, and returning exams through EEE+ RapidReturn is moving to Gradescope in collaboration with UCI Transportation & Distribution Services. Additional steps are involved because Gradescope was designed primarily as a grading platform, not a document return system. Normally, in Gradescope, instructors identify every question on an exam and assign point values. However, this new workflow streamlines grading by creating a single “question” representing the total exam score written on the paper.
After your exams are scanned by Document Management, you will:
- Upload them to Gradescope
- Create a template with this single “question” (representing the total exam score)
- Assign the appropriate point value to each exam.
The instructions below will guide you through this optimized workflow, allowing you to continue grading on paper while leveraging Gradescope for exam returns.
Assumptions
Use the entire process outlined below if:
- This is your first time using Gradescope. If you’ve used Gradescope before, skip to this section.
- You have graded and provided feedback on the exams by hand.
- You will provide a written total exam score on the cover sheet provided by Document Management.
How to Integrate Gradescope with Canvas
The steps in this section assume that you have already created a Canvas course space. If you have not, create a course space first.
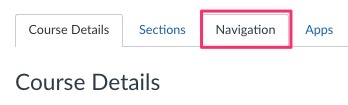
- Open your Canvas course space and click on Settings.
- Click on Navigation near the top.
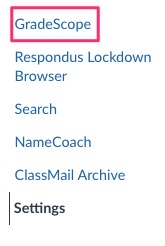
- There are two lists here. Drag Gradescope from the lower list to the upper list.
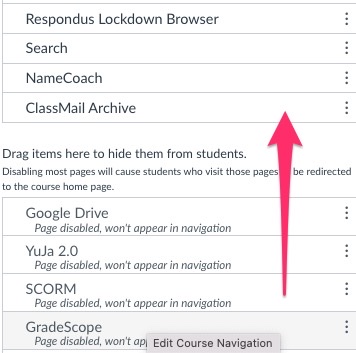
- Click Save at the bottom of this screen.
- Gradescope should now appear as a menu item on the left-hand side of your Canvas course space.
Creating a Gradescope Assignment in Canvas
- Open your linked course in Canvas.
- Select Assignments from the left sidebar menu and then select the +Assignment button.

- Enter your assignment name, possible points, and corresponding dates.
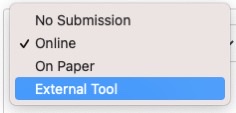
Note: Extensions, late, or section-specific assignment dates set on Gradescope are not automatically synced to the Canvas assignment. Ensure the due dates on Canvas and Gradescope are the same to avoid confusion. - Scroll down to Submission Type.

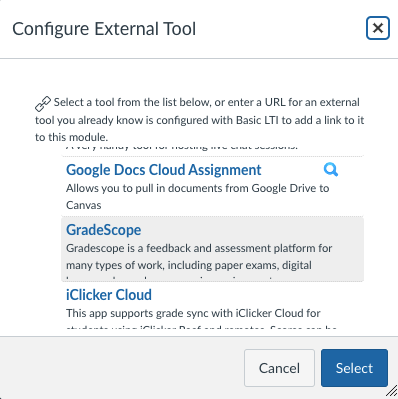
- In the drop-down menu, select External Tool.
- Click the Find button under External Tool Options.

- Find Gradescope under the pop-up list and then click Select.
- Select Save and Publish.
Linking to a Canvas Course
- Open your Canvas course space and click Gradescope from the navigation menu.
- Gradescope will appear in another window.
- You will be presented with a pop-up. Under the Link With section, click A new Gradescope course.
- Click Link Course.

Choose Scoring Method (In Course Settings)
After you link your course, you’ll land on a page to select settings for your Gradescope course. Gradescope’s default scoring method is set to negative scoring where points are deducted from the total maximum score. Since grading is based on the total grade written on the cover sheet, select “Positive scoring”.
Once the settings have been selected, click Update Course.
Syncing Your Roster
- On the left navigation menu, click Roster.
- In the middle of the screen, click the Sync Canvas Roster button.
- A pop-up will appear. Click the Sync Roster button.

- Your course roster and a green confirmation message will appear at the top.
Creating Exams in Gradescope
Creating an Exam Assignment
- On the left navigation menu, click Assignments.
- Click the Create Assignment button.

- Select Exam/Quiz as the assignment type. Click Next.

- In Assignment Settings, upload the PDF that contains the blank cover sheet and exam template that Document Management provided you. Fill in the rest of your assignment settings.
a. Under Create your rubric, click While grading submissions. You will be entering each student’s total exam grade as you’re grading.
- Click Create Assignment.
Create Outline
- Click the +Create Name Region button. Place the name region on the part of the cover sheet where students will write their names. You can expand it if necessary.
Note: Do not use the ID Region. Gradescope uses different ID numbers from the Registrar-assigned ID numbers students are familiar with. Instead, Gradescope will use the Name Region to attempt to match the exam to the student.
- Click +New Question. Enter a question title and the number of points possible, then place it over the “Total Correct” section of the cover sheet.

- Click Save Outline.
Managing Scans
- You will be redirected to the Manage Scans section.
- Click Select PDF Files to upload student exams provided by the Document Management team. It is most efficient to upload a single file containing multiple PDFs.
Note: The submissions will be created automatically.
- Click Manage Submissions.
Note: Gradescope will attempt to associate students to their corresponding exam automatically.
Manual Association
Gradescope may fail to match every exam file with a student for various reasons (e.g., students with the same name, illegible handwriting). In these cases, you must manually associate the student to the corresponding exam. Click a name in the dropdown menu beside the student’s exam.
Grading Submissions
- Click Grade Submissions.
- Click the question you want to grade. As a reminder, only one question is created since you’re using this to grade the student’s total exam score.

- A pop-up will appear. Click Review Groups.

- Click the Grade Individually button to grade your submissions manually.

- Click +Add Rubric Item if one hasn’t already been created.
- Enter the student’s total score.
- Click the number icon beside it.
Note: as a shortcut, you can press the number corresponding to the total score on your keyboard to select the score you entered (e.g., press “1” to select 77.5 points). - Click Next Ungraded to grade the next submission.
- Repeat Steps 5 through 7 for the remaining student submissions.
Note: Instructors can select a previous grade from the rubric list when grading other exams, rather than entering identical grades as a duplicate rubric item.

Note: this screenshot reflects steps 5 through 8.
Publishing Grades
Once you finish grading, you will be redirected to the Grading Dashboard, where you can post grades on Canvas and/or publish them in Gradescope.
Posting Grades to Canvas
- Click Review Grades.

- Click Post Grades to Canvas.

- If there is no Canvas assignment linked, click Edit.

- Select the assignment you want to link. Click Link Assignment.

- Click Save at the bottom of the screen.
- Click Post Grades to Canvas.
- Click Post Grades.
- A message will appear confirming that the grades were successfully posted to Canvas. Click Close.

- Navigate to the gradebook in your course space and confirm the scores have been synced.
Publishing Grades in Gradescope
Grades must also be posted in your Gradescope course so that students can view their grades and submissions in Gradescope.
- Click Review Grades.
- You will be taken to a new section. Click Publish Grades.

- A green message will appear at the top of the screen confirming that grades are published.