Website
https://www.polleverywhere.com
Support Contact
https://sites.uci.edu/polling/contact/
Help Documentation
Poll Everywhere
Suggested Uses
Creating an Account
Connecting your Course to Poll Everywhere
Creating an Activity
Types of Activities
Poll Everywhere
Poll Everywhere is a polling, participation, and engagement tool. With Poll Everywhere, students can respond to questions or polls in real-time, or otherwise provide immediate feedback. Instructors can also use Poll Everywhere to track attendance and participation.
Suggested Uses
- Increase and measure student participation.
- Track attendance.
- Gauge students’ understanding of a topic.
- Quiz students.
Creating an Account
To create a new Poll Everywhere presenter account, log in with your UCInetID and password as follows:
- Go to http://polleverywhere.com/
- Select Login in the upper-right corner.
- Enter your UCI email address as it is listed in the campus directory and select Next.
- Log in with your UCInetID and password. Your account should automatically be created.
Confirming a Licensed Account
If you create an account without signing in through the campus UCInetID single sign-on system, you’ll end up with a free account and will be subject to limitations including a cap on the total number of respondents and inability to use the Canvas integration.
To confirm whether or not your account is licensed:
- Visit your Poll Everywhere profile at https://www.polleverywhere.com/profile/edit
- Check the Account Information at the bottom of the page.
- If your account is under the campus license you should see: “You are on the FTE university wide Plan. Click here for more information about your account.“
Connecting your Course to Poll Everywhere
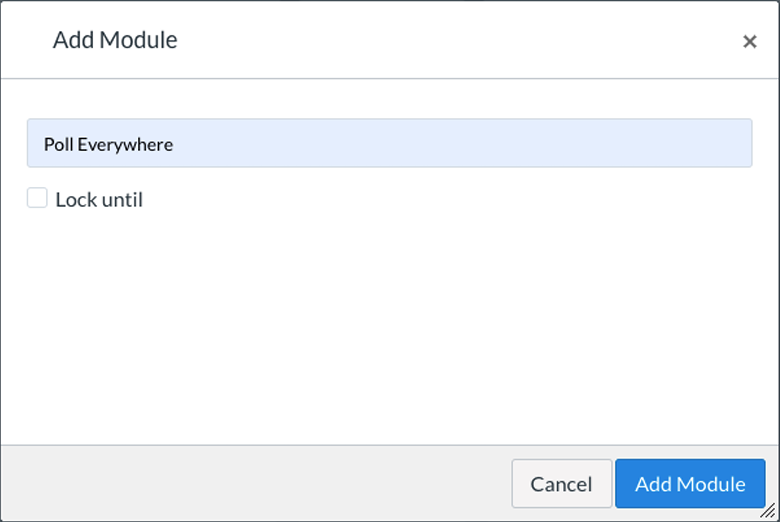
- Go to the course that you wish to connect with PollEverywhere and click the + Module button. Name the module in the popup window, then click the Add Module button to save.
- Within your new module, click the + button.
- From the dropdown menu at the top of the popup window, select External Tool, then select Poll Everywhere. URL and Page Name fields will auto-populate below. Check the Load in a new tab checkbox and click Add Item to save.

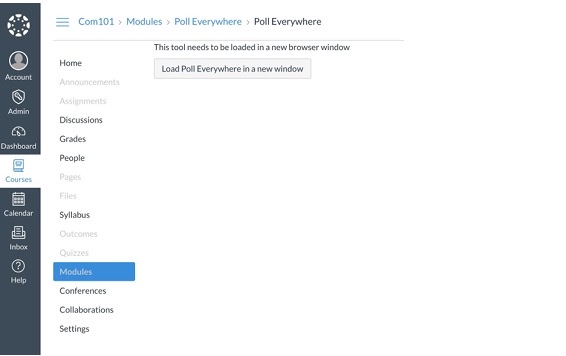
- Click on the new Poll Everywhere link that you made within the module.
- You will see a Load Poll Everywhere in a new window button. Click this button to launch the Poll Everywhere connection.
- In the new tab, you will be asked to acknowledge you are launching Poll Everywhere through Canvas. Acknowledge the launch.
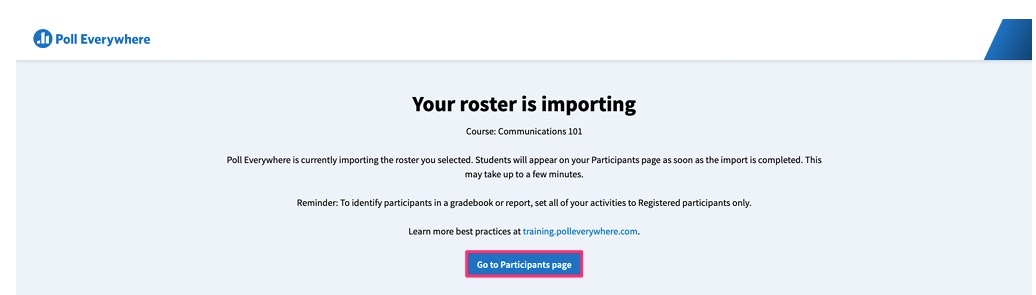
- On the next page, you will see a Sync roster button to import the students from your course into Poll Everywhere.
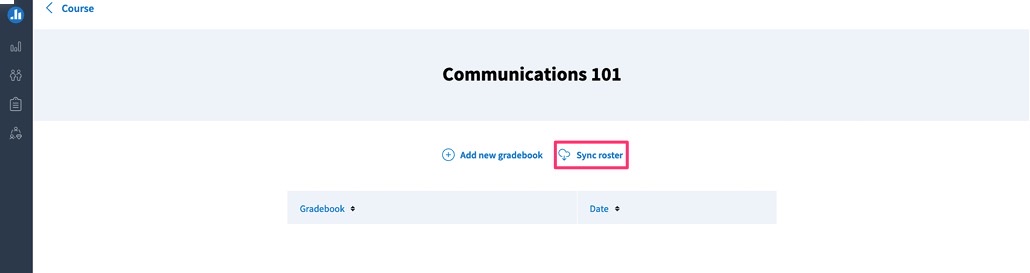
- After you click this button, a page will inform you that the participant import is proceeding, and you will see a Go to Participants page button. Click the button. Once on the participants’ page, you will be able to verify that the import took place because there will be a new group named after your course.
- Now that you have connected your course to Poll Everywhere, you can delete the module you used to make the connection. Optionally, you can use the link in this module to perform future LTI actions.
Creating an Activity
- Log into Poll Everywhere.
- Tap the Activity button on your Activities page.
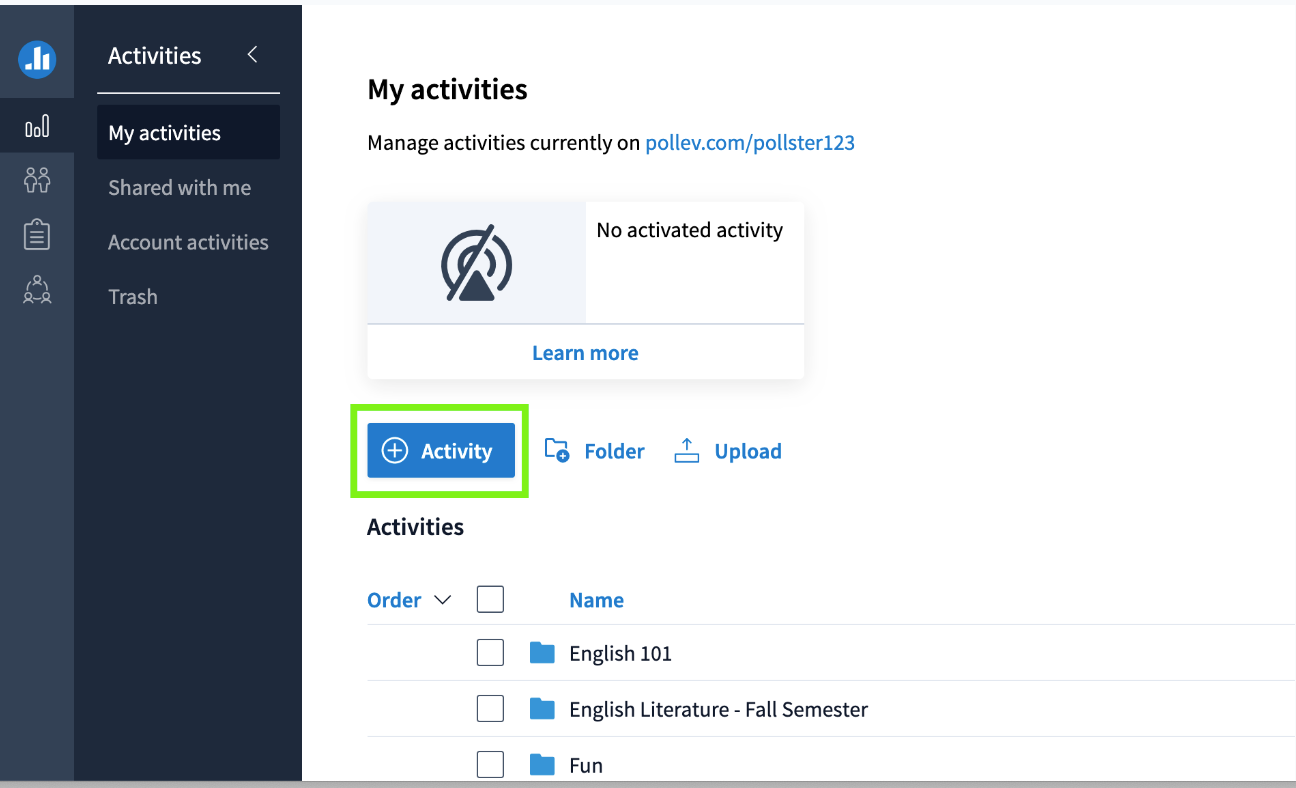
- Select the activity you would like to create for the audience from the Activity Creator Tool. You can choose from the main 7 activities (Multiple choice, Word cloud, Q&A, etc.) or find more templates when you hit the More button on the right.

- Enter your question or prompt.
- When you’re ready, assign the activity to a Group by opening the dropdown section at the bottom of the Activity creator tool and select the group you want to add it to. If you don’t choose a group, your Activity can be found in your Default group.

- Once that is done, click the Create button to start presenting your activity and save it to your account. If you’re creating bulk Activities, click Add another activity instead and this will save your Activity and take you back to the Activity creator tool, where you can create more.

Types of Activities
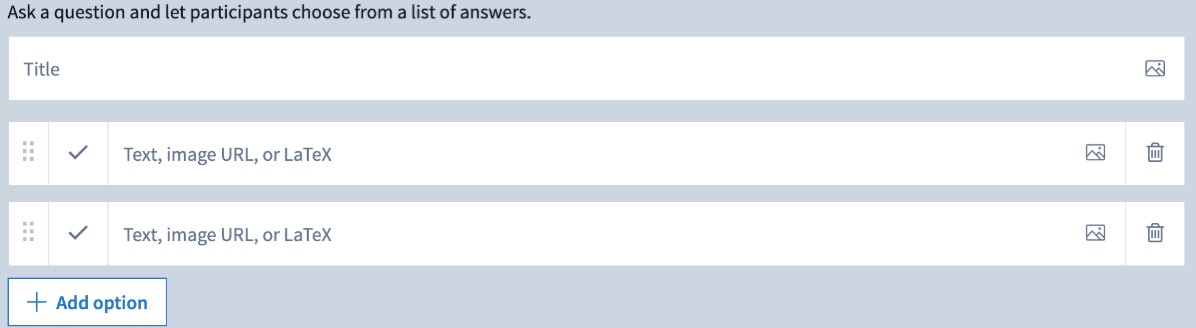
Multiple choice Activities: Once you enter your prompt, enter the response options you want the audience to select from. To add more response options, click the plus Add Option button on the bottom left. To delete options, click the Trash icon on the far right of the option you wish to delete. To rearrange the order of the options, click and drag the 6 dots on the left side of your options. You can designate correct response(s) to a Multiple choice Activity. Check the box to the left of the correct response option(s). A correct response will be highlighted green, when you reveal correctness on the Activity chart. You can set as many correct responses as you wish.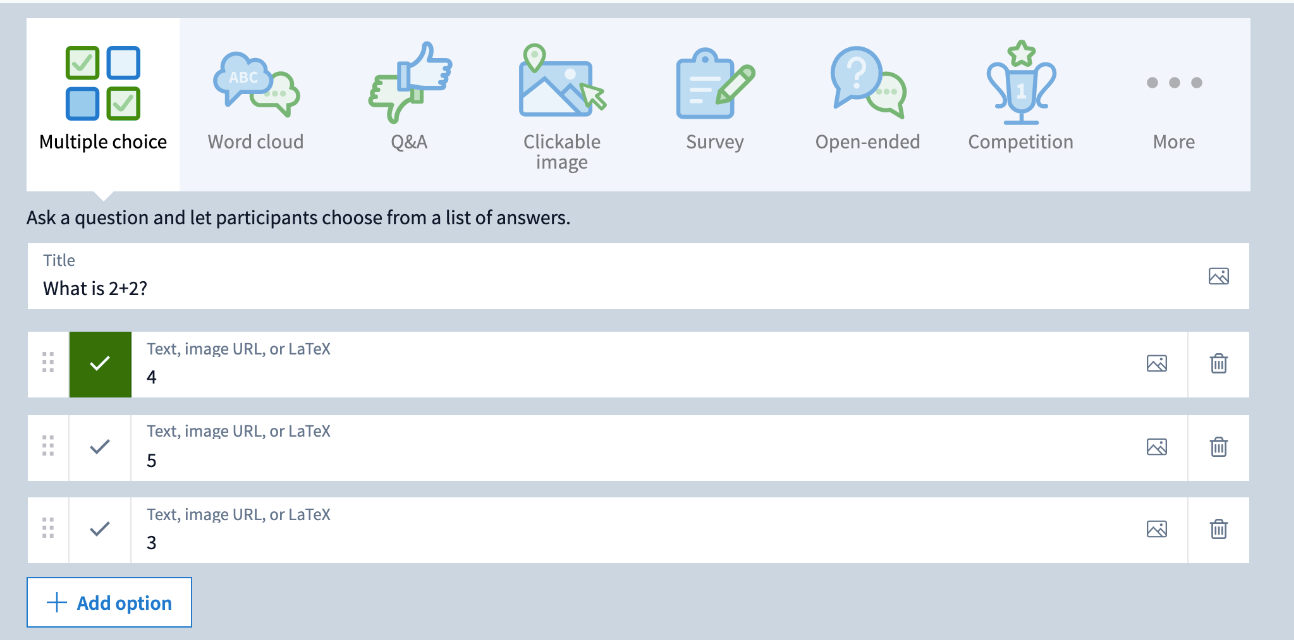
Word cloud, Q&A, or Open-ended Activities: Simply enter the question or prompt. For Word cloud and Open-ended activities, you can use images as your prompt by pasting a direct link or uploading one from your computer by clicking on the Picture icon. You cannot use images for a Q&A activity.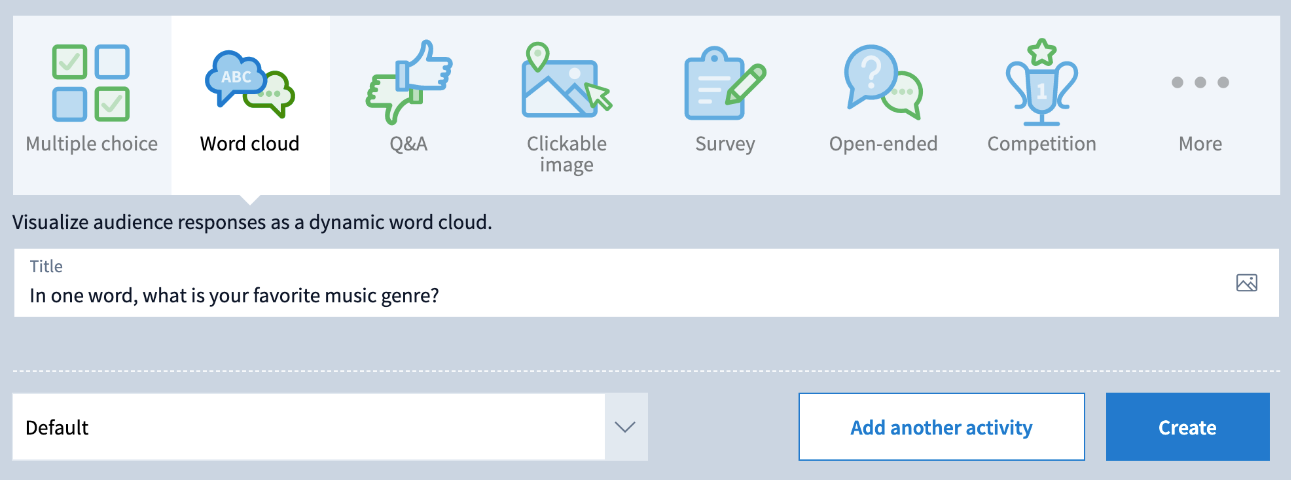
Ranking Activity: To find the Ranking activity, click the More button on the right. This will reveal more Activity types for you to try, including Ranking.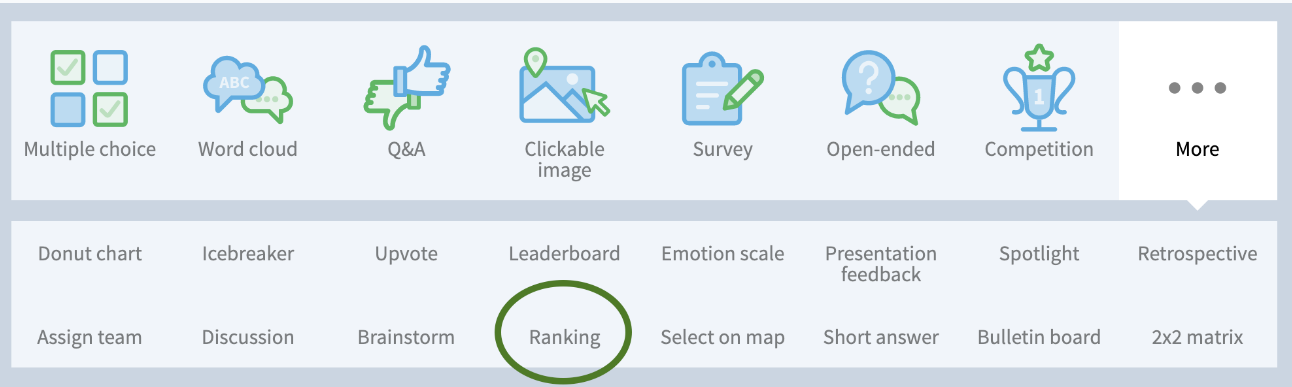
Just like multiple choice, you can enter text or add images as answer options. Once you’ve entered all of your response options, you can use the 6 dots on the left to drag and reorder the options.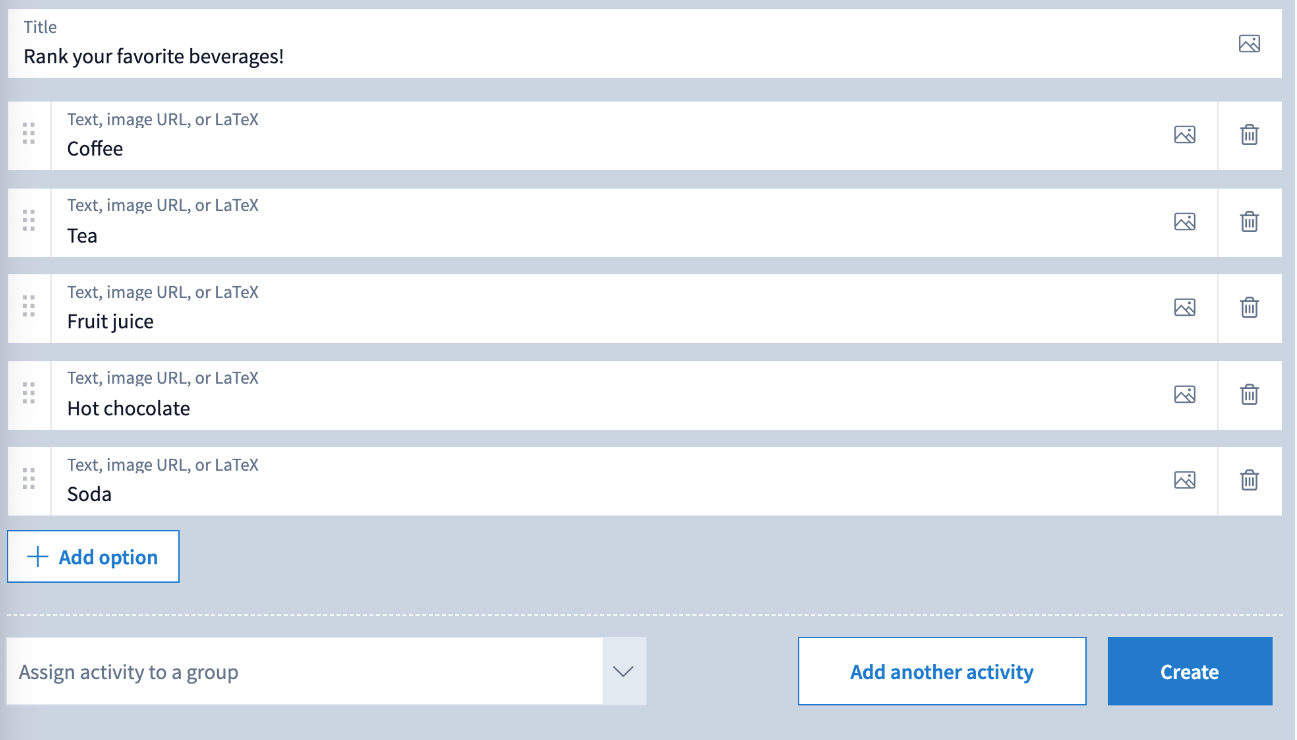
Clickable image Activity: Select one of the provided images, or upload an image you would like the audience to interact with. Then enter your prompt.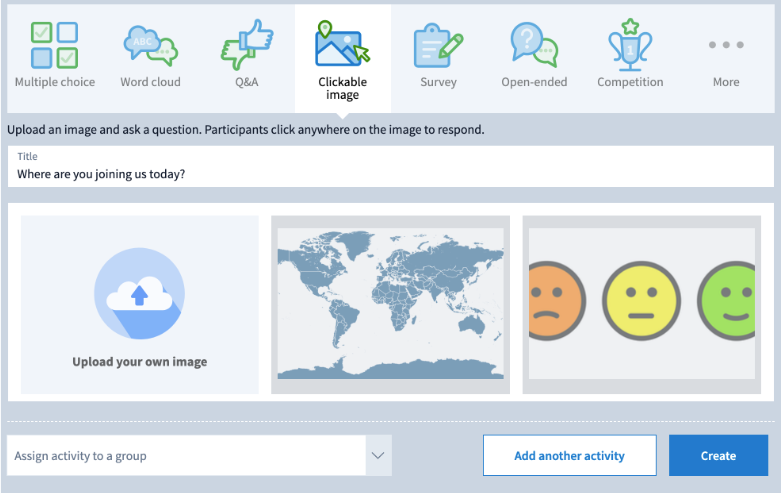
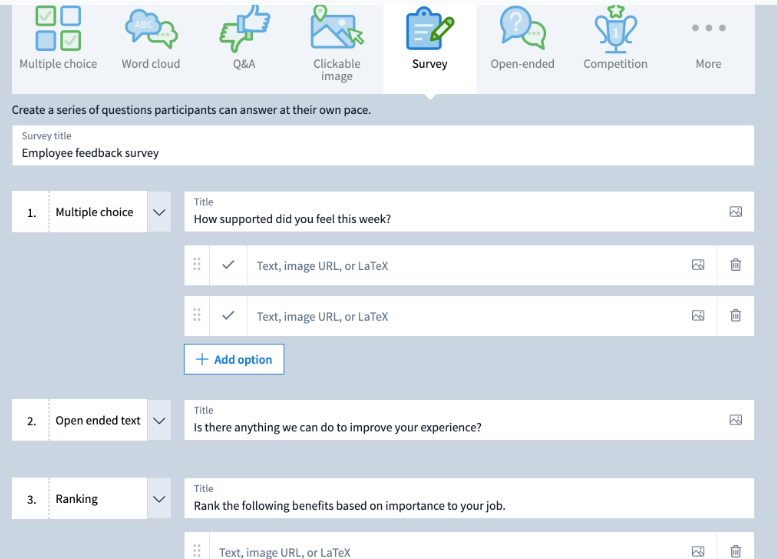
Survey: Give your survey a title, and add a series of activities. Click the dropdown arrow next to the Activity type to select from Multiple choice, Word cloud, Q&A, Clickable image, Open-ended text, and Ranking. Once you select the Activity type, you enter your prompt as usual. To add more Activities, select Add another question under the last Activity. Surveys allow you to ask your participants multiple questions at once. Everyone can answer the questions privately at their own pace. Surveys are great for quizzes, pre- and post-training assessments, and questionnaires.